Bracelet 117
11 22 11 22
Variation: 1234 1234
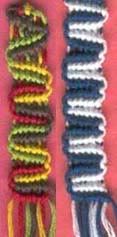 | 1.Using the first thread on the left, make 7 fk.
|
2.Using the second thread on the right, make 6 bk.
|
3.With the first thread on the right, make 5 bk and 1 bk/fk.
|
4.Using the first thread on the left, make 1 fk/bk.
|
5.Using the second thread on the left, make 6 fk.
|
6.With the first thread on the left, make 5 fk and 1 fk/bk.
|
7.Using the first thread on the right, make 1 bk/fk.
|
8.Repeat from step 2 for pattern.
|

posted by Heather | 7:37 PM
|

Grrrrrrrrrrrrrr!
Looks like I abandoned the blogging business after just one entry, huh? Well, not exactly.
I've been biting my toenails for the last few weeks trying to get the template just right, and I thought I did only now I realized that all my hard work means bubkus to EI. WHY ME! (kneeling and beating my fists on the floor)
It seems to be fine everywhere else, so now I have to go back and examine every line of code that I thought I was done with. Almost makes a cusstotaller want to curse! A better solution: settle in with some thread, a good idea and watch Curb Your Enthusiasm.
So, now you know.
posted by Heather | 8:55 PM
|
Q&A: Straightening lines, knot tension, and more
Q: How do you make a bracelet with letters but with varying background colors?A: There are 10 background threads and the colours of those are totally up to you. You can make each one a different colour if you so desire. I think the only rule for these bracelets is that the colour of your letter thread be contrasting enough to stand out against the background. You can have 5 different pastel colours for your background and use black or another darker colour for the letters and it should work out just fine.
Also, a variegated thread might also be helpful in this instance. The effect will be different than what was described previously but you may want to give it a try.
Q: How do you make it so the knots go straight across? When I do it my knots always go diagonally.A: The lines will automatically slant as you do them, and that's ok but you have to manually straighten them after you finish the first line. Just push them into position until they are straight. You want to do this after the first line because the second line locks the threads into place and you won't be able to do it after that point. Of course, if you want italics then ignore everything I just said.
Q: When I make the letters it doesn't seem like it's tight enough and has a little extra string in the middle, like it can't reach the knot? Any tips on managing the string while your making it?A: A large part of this comes with practice, I think. You are not doing anything wrong, but as you go along you will get a better feel for the threads and things will improve. One think I can suggest is that you shouldn't tighten the second tie if the first isn't up close to the previous knot as you would like. So, as you are getting ready to complete the second tie, tighten the first one again to make sure that the space is less. That should help some.
Q: I can't figure out how to do the inverted V.A: The inverted V is made with the 2 threads in the middle of the bracelet. Make a knot with both threads, it could be either a bk or fk. Next, using the middle thread on the left, make one backward knot on each remaining threads. On the right side, make forward knots on each thread. The number of knots you make vary with whatever pattern you are making.
Q: I am having a slight problem in trying to end off my bracelet. I don't understand about the braiding thing. A: It's just like you would do with your hair. Once you get to the point in the bracelet where you don't want to go anymore, divide the threads into 2 sections. Take the first section, separate it into 3 sections and braid those like a regular braid. At the end, put an overhand knot in it to secure it. Repeat with the second section. You now have to 'tails' which you can use along with the loop at the top to secure it to your wrist. To do that, you will put one braid into the loop, adjust it to fit your wrist and then tie the two braids together.
posted by Heather | 10:35 PM
|
 Current Posts